Monday, January 14, 2013

I made this up?

     There are times where I am still shocked when I come up with an idea and work out how to make it happen all on my own.  No blog inspiration.  No Pinterest picture to copy.  Just an idea in my head that becomes something I love.  That happened with this adorable little owl I made for my 6 month old niece, Addison, for Christmas.


     Unlike the nephews, Addison is still too little for the dress up, imaginative costume presents I made for them, but I wanted to make something special for her.  I knew I wanted it to be something soft and cuddly, and the ability to soak up drool while being sucked on probably wouldn't hurt either.  Luckily, with all the bibs I make, I always have terry cloth around here, and owls are always so cute.  Stroke of genius - my plushie teething owl was invented!  And lucky for you, its time for another tutorial!

Plushy Teething Owl Tutorial:

     1.  The first step in making this happen was picking out the fabrics to use for the wings, tail, eyes and feet.  This is the perfect project for looking through all those scraps you save just knowing they will come in many some day.  I chose two flannel fabrics because of how soft and fuzzy they are, but any fabric you love and have tiny pieces of will work.  If you have fleece or felt you want to use, you won't have to finish the edges and this owl will be even easier to make for the drooly little baby you love!

     2. The next, and most important step was making my pattern.  

To start working on my pattern, I just sketched out a simple little own on some lined binder paper.  I like using the lines, because it helps me to work out size ratios and making things more symmetrical.  Drawing is really not my most developed skill.  I am much better at embroidery and sewing, but without drawing the pattern first, there is no way that most of my projects would work out, so I use all the tools at my disposal to do my best with the sketches.  

If you want to make your own pattern for an owl or any other creature you are into right now, so remember that the simpler the shapes, the easier it will be to make into something squishy and cuddle-able.  The pieces have to be cut out, sewn and turned inside out, all out of thick terry cloth.  Small details will end up getting lost.  You just want the big picture/ main idea of the animal here.  

I drew the owl outline, then started adding the details on.  I drew the tail on the same original pattern piece as the face and wings to work out size and placement.  After sketching all the important body parts and deciding I was happy with their size and shape, I traced them all with a thick, black pen.  

After drawing the whole owl, I put another piece of paper on top, and traced the details pieces onto another piece of paper, again with the thick black pen.  

After doing that, I ended up with two pattern pieces that looked like this:
One of the whole owl, and one of just the pieces.
     3. Cut out all of the pattern pieces.


     4. Use the main pattern piece to trace your owl friend onto the terry cloth.  Cut the fabric bigger than what you traced.  The edges do not have to be perfect, you will cut them down and fix them after sewing, right now you are just cutting so that you have an easier piece to work with and do not have to drag a giant piece of terry cloth around from wherever you are cutting to your sewing machine. 
     5. Use the detail pattern pieces and your detail fabric to cut out the adorable accent body parts.  Again, trace the pattern and cut the fabric bigger than the area you traced.                      

***If you are using fleece or felt, cut it to the exact size of your detail pattern pieces because you will get to skip the edge finishing steps here.***                                                             

     6. Lay the detail pieces out on top of the terry cloth pieces and start getting excited about how cute it is going to be.  
     
     7.  Finish the detail piece edges.

This is probably the hardest step of this project, which is really saying something about the project, because this step is not that hard.  

First, cut some notches from the edge of where you cut to the blue line where you traced.  Do this especially around the curved edges.  The more notches you cut, the smoother your curve will be.

Next, fold the edges down along the blue traced line and use your iron to press  them in place. 

If you notice on this picture, you can still see some of the blue line I traced.
You can be more particular and careful and try to make sure this doesn't happen, but really,
 the lines will come out on the wash, so as long as you are happy with the shape of the
pieces, don't worry about the blue lines.  
  

8.  Using a needle and whatever color embroidery thread you like, simply stitch around the edges of the pieces onto the terry cloth.  Don't forget to put the tail on the back piece and the eyes and wings on the front piece!  Also, leave some room around the edge of the pieces, or else when you sew the whole thing together, these details you just worked so hard on will disappear into your seams.  

Big pregnant bellies make a really good shelf for your supplies!
      9. Choose a different color of thread and embroider the beak onto the terry cloth below the eyes.

     10.  As carefully as you can, line up the blue outlines on the two owl terry cloth pieces, right sides together.  Sew The pieces together along the blue line - BUT DO NOT sew along the bottom edge where the feet will go.  If you can't see the line through the terry cloth, go ahead and retrace the big piece onto the back of the fabric, it will make the sewing easier and less frustrating and will only take you a few seconds to do.  

Cut the extra fabric away around the line you just sewed.  

Turn the piece right side out.

Again, take a second to get excited about how cute it is going to be.  

     11.  Make the feet!

Trace the foot pattern onto the foot fabric.  You will need two pieces of this fabric for each foot, so I recommend doubling the fabric, then you only have to cut once.  Remember!  Cut bigger than you trace!

With the right sides together, sew the two sides and the bottom edge.  I tried to make adorable little toes here, but the details were so small, it did not end up working out.  Some frustrated ripping out and retrying 3 times later, I decided I liked them better without toes!

Turn them right side out.  


     11.  Stuff the owl body with cotton or polyester stuffing, whichever you have around or like to use.  More stuffer = a stiffer toy, less stuffing = a more flopsy toy.  Totally up to what you want.  Put some in, squish it and see how it feels, add more, take some out, make it just the way you want!

     12.  Fold in and press the open terry cloth edges along the bottom.

     13.  Stick the feet in between the pressed edges, pin in place.  

     14. Machine or hand sew the bottom edge together.  

     15. Either machine wash or rinse in the sink to get out the water soluble blue pen you used for all that tracing.  Machine dry or hang to dry (the stuffing will make this take awhile, but it is doable if you don't want to run your dryer just for one little stuffed animal and for some miraculous reason you have no other clothes to wash).  

     16. Ta Da!  You are done!  Give it to that teething baby you love to snuggle, squish, gnaw on and drool all over!


     I am having so much fun writing these tutorials on all the fun projects I made for Christmas.  A few more are in the works in the next few days.  In the meantime, working on lots of new fun projects every day to get ready for this little girl and two more little girls coming soon after: curtains, blankets, mittens, a diaper bag for me, projects for friends: valentines shirts and wedding bunting, and projects for me before I run out of time: The wedding napkin quilt!  

     We will see how they all go (especially that last one) and what I will really have time for.  So far still feeling great with this big old belly.  Just giving myself an excuse to be lazier than I probably need to be, and eating lots of snacks.  

     I will be spending the afternoon today simplifying the items for sale in my Etsy shop.  It was a hard decision.  I love and am proud of all the items I have for sale.  I have worked hard to get everything set up the way it is, and all of the made to order, customizable options I have for my customers. I love doing these custom orders, and the excitement that comes with a new order knowing I have to get to work to make something someone out there will love.  I decided though, that I really don't want orders coming in that I can't get done in a few days if this little girl comes early.  I do not want to be disappointing my customers and leaving people waiting.  So after today, I will only have items for sale that I actually have made, done, ready to go out the door.  When I actually go into labor, the whole shop will go on vacation for at least a few days, so if you check the shop and it is closed, you will know where we are!  

     I do not want to lose the momentum I have built up with my shop (and this blog).  Hopefully it will be back up and running quickly.  Thank you to everyone out there who has been supporting me in this crazy new life plan.  Please keep checking back and spreading the word!  


Thursday, January 10, 2013

roarrrrrrr!!!

     For Christmas this year I tried to make as many presents as possible.  Last year when I was teaching full time, trying to make Christmas presents was fun, but slightly stressful trying to find time to get everything done.  This year when I have so much time to focus on sewing and to really think about all of the people I love, it was fun and fun!  And making things for the kids was extra fun!

     My nephew, Jack, is 20 months old and he loves dinosaurs (and trash trucks, and fire trucks and pretty much any kind of trucks!).  I have been pinning to a secret "presents" Pinterest board for the past few months.  I love pinterest, but have wanted secret boards for awhile.  Although I do spend way too much time just trolling all of the popular listings on there as a way to procrastinate the things I should really be doing, I do really try to use it as a way of collecting projects and ideas I like and do not want to lose track of.  I try to pin as much as I can from blogs I read regularly that inspire me, and not just repin those same pins you see over and over again.  Sometimes though this is a problem, because some project I see instantly strike me as a perfect present for someone, and what if that someone happens to be my Pinterest friend, then they will know what I am planning!  Oh, poor me, my life is hard!  Haha!  But this is why I was so excited when they started allowing secret boards.  Really helped in my Christmas planning.

     Any dinosaur related projects I saw over the past few months went instantly to the presents board.  When it came time to get to work, these two tutorials were the winners I based my plan on.  I completely recommend both of these tutorials if you would like to make your own dinosaur tail or sweatshirt.  I did make some changes, because clearly I decided to make things a little more complicated, adding some fun details.  So here is my tutorial and how to take the amazing work of these women and make it a little more like mine.

Dinosaur Tail!

Materials:
Click on the original link!  She lists all the quantities of materials.  The only difference in my tail was that I used 2 different colors for the spikes, so if buying fabric, buy 1/4 yard each of the two different colors you want to use, you will have extra for some other fun project or you could make two (in case your husband decides the tail is really cool and he wants one too, like mine may have).

Procedure:

1. Click the link again!  Follow her instructions for step 1, trimming tail fabric.

2. Here is where I started making changes.  The original tutorial makes a spike strip, making the project simpler, but only having one color of stripes.  I wanted alternating spike colors, so I knew the strip wouldn't work.  So the first thing you have to do if you want to be cool like me is make a spike strip pattern out of tissue paper (or any other paper you happen to have around the house).


I worked on mine on the ironing board only because it is tall, and
I am tall, and have a giant belly currently, and bending over
any of my tables is not particularly pleasant. 
The strip needs to be the same length as the tail (22 inches) and I would recommend about 3 1/2 inches tall.  Here is where the ruler comes in handy.  Or you could just put the paper next to the fabric you just cut.  I did actually measure, turns out my paper was shorter than I needed it to be, so I cut some extra and taped it to the end.  Ta da! Problem solved!  

Once you have cut the length, draw your spikes!  I started big at one end and went smaller, so they will be smaller at the skinny end of the tail.  This part is up to your own creativity, they can be more rounded, more pointy, a few big ones, lots of small ones, have fun with it.

My spike pattern had 7 spikes, just what kind of worked out
as I drew. 
Because I wanted to alternate spike colors, I labeled the pattern pieces A and B, and drew small lines between the spikes.  If you wanted more colors, you could label them with as many letters as you like, or really even just do each one a different color.  You have so many options!


3.  Start cutting the spikes!

To save yourself time and effort, fold fabric A in half.  Line up your spike strip pattern NOT on the folded seam - put the bottom of the spikes where the two open sides of the fabric are lined up.
Cut out the biggest spike on the pattern and through both layers of fabric.


Move the pattern down so that the next A spike is right next to where you just cut.  Continue down the line cutting all of the A spikes.  This will save you time switching back and forth between the two fabrics, just be sure to line them up as you cut them, so they don't get confusingly out of order.

You will be left with a piece of fabric A, and what is left of your spike strip pattern that looks like this.


4. Change to your other fabric color (fabric B, if you will...)

Do the same thing, cutting out the remaining B spikes, and placing the cut out pieces in the right places between the A spikes down the line.


5. Sew the spikes.  

You already have the two pieces lined up together because of the way you cut through both layers at once (see how I am looking out for you and making things as easy as possible?)


Working with one spike at a time, sew the two top sides of the spike, but not the bottom!

If you want the spikes more pointy - sew a straight line to the top, leave the needle down, but lift the foot, turn the fabric, put the foot back down and sew another straight line back down the other side.

If you want the spikes more rounded - sew slowly and pull/turn the fabric as you going around the point.

If you aren't so particular or want them somewhere in between - start sewing and see what happens depending on how much attention you were paying or how careful you were being.

One guess which of these three methods I mostly used.


Each spike will end up looking like this!


Cut off the top of the fabric above the line you just sewed.  Don't worry about trimming the other seams or bottom corners, anything that shows will be sewn into the inside of the tail.


Turn the spikes inside out.


6. Iron the spikes flat!


7.  Sew tail body.  Here again you can check back at Running with Scissors to see how she does it.  It is only slightly more complicated with 7 little spikes instead of one long spike strip.

You have two options here, again related to how much you care about things being "perfect."

The right way:
Line the spikes up on the top edge of one of the big tail pieces, with the spikes pointing down into the middle of the tail.

Pin them in place.

Sew straight down the line to attach the spikes.

Place the other big tail piece on top (I should note, if you are using fabric that has a right and a wrong side, make sure the right sides are together.  I used Kona Cotton which is the same on both sides).

Sew the two big tail pieces together all the way down the top edge, around the skinny end, and back up the bottom edge.

But Wait! - Leave a few inches open on the bottom edge so you can turn everything right side out and stuff the tail.

The easy way:

Place the spikes on one of the big tail pieces, pointing down and in.

Place the other big piece on top of the spikes.

Use some pins to hold things in place.

Sew the two big pieces together just as above.


8. Sew waist straps.

The only change I made here was the make the velcro strips longer.  My nephew is still pretty young, and skinny, and I was worried about the tail not being able to get tight enough to stay up around his little waist.  Longer velcro gives more freedom in sizing.

Read her tutorial for how to sew the straps.  They are pretty easy breezy.


9. Finish the tail.  Again, read her tutorial.  She does a great job of explaining the finishing steps for the tail.  I wasn't so particular with marking the 1/4s of the circles, I just pinned it in place, but again this gets down to how much you care about things being "perfect."  Mine turned out pretty darn good.   


It looked very cute on my table!  I had been keeping the project a secret from everyone in my family so they would all be surprised on Christmas, but when I finished the tail I was so excited by its cuteness I instantly had to FaceTime my mom to show it off to her.

Turns out Jack was with her at the time, but she succeeded in distracting him with Cars long enough for me to show her what I had made without him seeing.  

It looked oh so much cuter the morning after Christmas when Jack was wearing it to play with his firetruck.  

Dinosaur Sweatshirt!!!

I know, I know, after all that you thought you were done, but oh no - What if your little dinosaur wants to go outside?  There clearly must be a spiked sweatshirt to go along with the tail.  

I promise this part is much less work.  

1. Buy a sweatshirt that fits your dinosaur.  Hoods are pretty important here.  A cool neon, dinosaur-ish color also comes in handy.  Jack's is a neon yellow/green.  Awesome!

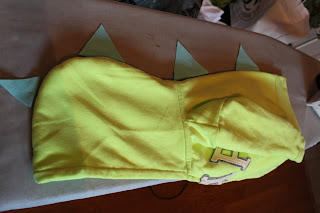
2. So that the tail and sweatshirt spikes matched, I used the same spike pattern pieces I cut out for the tail to plan the spikes for the sweatshirt.  

Fold the sweatshirt in half, lengthwise.  The hood of my chosen sweatshirt had a seam down the back, which made this easier, but just line up the front sides of the hood and the zipper edges, and iron to create an edge you won't lose.                                 

I placed the biggest spike at the top of the back, under the hood, then got smaller towards the bottom of the sweatshirt and up and around the top of the hood.  For the 2T sweatshirt I was using, it took 4 spikes down the back (including the biggest one) and 5 more up and over the hood.  The bigger your sweatshirt, the more spikes you will need.   


3. Next I did some math and a little drawing.  The curved line here is the folded, ironed edge of the sweatshirt.  The triangle marked 1 is the biggest triangle, then I just counted out in each direction from there.

I measured my spike pattern to determine the size of these spikes.  Number 1 was 3 1/4 inches tall.

Now is the time when you should probably check in with the original tutorial.  She is genius and realized that the best way to attach these spikes, is to make diamonds, so to make a spike the size I wanted, the diamond would need to be 6 1/2 inches tall.

****In the original tutorial she used felt.  I really wish I had read this before buying my fabric and making my plan.  The edges of felt do not need to be finished and make the end of this process easier.  The same goes for fleece if you want some fleece spikes.
If you want yours to match your tail, and you have been using Kona cotton like me, you will have to finish the edges.  Don't worry, it is a little extra work, but I will explain that process at the end.

If you want to use felt or fleece, you can switch to her tutorial now, or keep reading mine for awhile for sizing and placement.

If you are using cotton, you should probably just stick with my tutorial here.  ***

Each size smaller of spike I wanted, I cut out 1/4 inch from each half of the diamond, or 1/2 inch total.

This chart helped me work out the sizes and keep track of how many I needed to cut of each size.


In case my handwriting is hard to read, or just the picture:
How many       Spike number      spike size         diamond height
1                           1                          3 1/4"                  6 1/2"
2                           2                          3"                        6"
2                           3                          2 3/4"                  5 1/2"
2                           4                          2 1/2"                  5"
1                           5                          2 1/4"                  4 1/2"
1                           6                          2"                        4"

4.  Cut the spike pieces.

Use the same pieces of folded fabric you used for the tail spikes.  

This time you will be working with the folded seam edge.


Use a ruler and a water soluble pen (or chalk).  

Measure, mark and cut the triangles (when you open the seam you just cut on, it will magically - or by the powers of geometry - be a diamond).  I made my biggest spike 3 inches wide, each one got a little smaller, just use your judgement here of what you think looks good.   

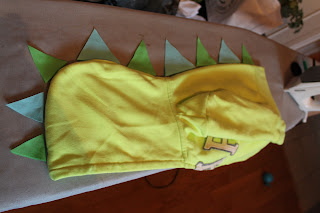
As I cut I lined up the spikes where I wanted them on the sweatshirt.  First the blue.


Then the green, too!


5. Unfold the sweatshirt and the spikes.  See, I told you they would become diamonds!  I then pinned the diamonds in place.

6. Take the sweatshirt to the sewing machine and sew a line (or two) straight down the back of the sweatshirt through the middle of all of the diamonds.


7. Here's where the (slightly annoying) edge finishing comes it.

Using your iron, press the edges of all of the diamonds in towards the centers.  You have have to do some trimming with scissors and careful folding at the corners.

Some of them may look ugly like this.

But hopefully most of them end up looking pretty like this! 
 8. Fold the diamonds back into triangles and pin them together.


9. Carefully and as best you can (there is maybe no way to do this "perfectly" sorry if you are one of those people.  I clearly am not, but even I was careful here and got the job done pretty well) sew together the two pressed and pinned edges.


10.  Do this too all of the spikes.

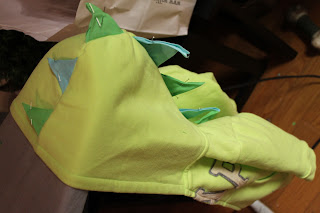
11.  Hold it up and look at how cool it is!  

12.  Get excited and realize that all of that edge finishing was totally worth the annoyance because now you have a dinosaur sweatshirt and tail that match!

13.  Put the sweatshirt on your favorite little (or big) dinosaur ASAP so you can giggle and enjoy your hard work.  And so that they can have fun too...

That is it! You are done!  I hope you have as much fun making this dinosaur project as I did, and hopefully you can surprise some little person you love!  Thank you so much to the two women who wrote tutorials on the original projects that I based my work on, and thank you to the random pinners out there who helped me find these projects and these great blogs which I now follow.  

Please, please, leave me comments if you have questions or tips on some of the tricky parts that might simplify things for others out there wishing to do the same!


Friday, January 4, 2013

"Full of things..."

     The fact that I am writing my Hapy New Year post on January 4th is probably not a huge surprise to the people who know me well, and is definitely a sign of how my life goes without deadlines, but here it is:

Happy New Year!!!

     I hope you all had a fabulous, restful, fun holiday and new year surrounded by the people you love! We were so lucky to be able to spend 8 days with family for Christmas!  I will tell the truth, the 8 hour car ride each way with this big ol' belly was a little squishy and rough, but getting to spend so much time with family was worth all the squishing in my ribs.  


A very good sticky bun making helper!


     There was some rain and lots of fantastic, wintery, chilly weather.  There were fires in the fireplace as long as we could convince Jack that they did not need his tending.  There were truffles, fudge, cookies and cheesecake.  There was verekrans (I am probably spelling this wrong, but man, oh man, this bread is delicious!) bread and Christmas morning sticky buns. There was a serious bowl of eggnog (but none for me)! There was lots of giggling and game playing.  There were beautiful Christmas trees and a house full of dark red flowers and decorations.  There were muddy, rainy dog walks in the woods.  There were presents and one lonely stocking for Jack.  There was some attempted dog bed sharing. 

And lots and lots of love!  

     
     We drove home on the 31st (or as most people call it, New Year's Eve) with a stop in Salinas to see long lost friends and meet their beautiful 9 month old twins and one more in Simi Valley for more family, presents, a dog walk and giggling.  The goal was home in time for fondue and chocolate mousse for dinner, but after 12 hours in the car (addictedly listening to Gone Girl on our brand new audible account) pizza it was.  The traditional New Year's Eve dinner of almost every year of my life was postponed for one more day.  

     This has kind of been a stretched out season of thinking about the old year and the new, things that have already changed and the changes that are coming.  Starting with welcoming back the sunshine on the Winter Solstice (or making it through the Mayan Apocalypse, whichever December 21st may have meant for you) through today, and I'm sure the weeks to come, changes are a constant part of my life.  While looking for a new quote for our chalkboard, I came across this one yesterday:

"And now we welcome a new year, full of things that have never been"
- Rainer Maria Rilke

     2012 was a year full of things that had never been, change and growth I planned and change and growth that happened to me.  Taking a break from teaching, turning Fun Little Things into a real small business, getting pregnant (!!!), losing Buddy way too young, getting chickens and I'm sure so much more I just can't remember right now.  2013 is going to be a year full of so much more growth and so many more changes I can barely even fathom or plan for yet.  

     My only New Year's resolution? Have a baby!  She is coming sometime in the next month!  I can barely believe how quickly this has come!  We have the baby room almost ready, just waiting on one more Amazon delivery due to arrive today (yes, I admit, I am stalking the delivery tracking online - As I type this it is listed as Out for Delivery!) Hoping to learn how to install a car seat this weekend.  Dresser full of washed and folded tiny little baby clothes and mountains of cloth diapers just waiting.  I am still planning some projects for her (and for my two little baby nieces coming just a few months after ours).  Aside from that I have realized there is nothing I can plan for this year to come.  I wait to meet her and to see what our life becomes.  So in the meantime, I sit here:
The most comfortable and beautiful glider -
a baby shower present, refinished by
my mama!
or here:
yes, it needs a little more air, but this is the best we could
do without a pump!
I stretch, I go to yoga, I cuddle with Lacey, I clean (... a little bit), and in the weeks to come I will be writing at least 5 blog tutorials with all of the fun Christmas presents (and one birthday present) I made in the last few weeks.  A little teaser of what you can look forward to ---


Plus more! So keep checking back!  

     In the meantime, I hope you are all looking forward to a new year, full of things that have never been!