Saturday, July 9, 2016

Shutting Down

     August 2, 2011 I started my Etsy shop.  June 19, 2012 was my last day teaching.  Since that day, I have been working on making Fun Little Things a real business.  A business that I loved working on.  A business I learned so much from over the last almost 5 years.  A business that I hoped would bring in some helpful income for our family (more successful on that one at some times than at others).  A business that brought me a lot of joy to see first my bibs and later my tiny clothes on babies and toddlers nearby and far away (and of course on my own girls very often).  A business that I have felt very proud of.

    This last year has been harder.  I have had lots of hopes and plans for Fun Little Things and less and less time to work on it.  I have had so much support from everyone around me, especially Kyle and my mom, to help me find time to work, help me sell at craft fairs, help me take one million pictures, listen to me talk (endlessly?) about all of the business stuff I was learning online and all of my plans.  Many of my plans did not work out the way I had hoped.  That is business and it is all part of the learning, but it is still disappointing.

    Fun Little Things started bringing me less joy.

And then in February of this year, I started a new business.  One I had been secretly dreaming about for a long time.  I did some online research.  I started talking about it bit by bit with the people I trust most.  And then, without really telling anyone anything, I did it one day.  I started a new Etsy shop and a new Instagram and Maker Mountain Fabrics was born.


And friends!

Friends!  I have been having so much fun!  I am using everything I have learned about business and social media marketing and sewing throughout the life of Fun Little Things.  I am buying bolts of beautiful fabric that inspires me and that lights me up when I discover it online and makes me giddy when it shows up on my doorstep.  I am buying patterns for gorgeous garments from talented independent designers.  I am sewing what I want for myself, the girls, the house...

Maker Mountain Fabrics is growing and growing.  Sales are coming faster than I have ever experienced with Fun Little Things and my social media following is growing and engaged and feels real and right and it is great.  Like, so great!

And now, Maker Mountain Fabrics has a new website (still very much in progress) and a new blog (with the first post up and waiting for you to read it).  

So now I have two businesses, one I love and one that feels disappointing.  And more important than either of those, I have these two awesome little girls.

And I love them a lot.

And they don't sleep all that much anymore; not like they used to.  So my time to work is ever decreasing.

Shutting down Fun Little Things is something I have been thinking about for awhile now.  I kept telling myself "try this one more thing, first".  And I have been feeling a bit sad about letting it go, thinking about all the time and the hope and the work and that first joy and excitement.

But suddenly, I am ready.  I would rather spend the time I have on Maker Mountain.  Or playing with the girls.  Or going to the beach or on a hike with my family on the weekend.  Or going to yoga.  Or reading a book.  Oh, reading... I miss you.  or sleeping a little bit more.  And I guess maybe I should spend some of that time cleaning my house a little more regularly.

 I guess.

There are so many great things in my life.  I am not letting disappointment or my stubborn desire not to fail, keep me doing something that is not bringing enough reward for the amount of work.

And right when I made the final decision, and spent the early morning hours writing this post to share the news with all of you, I discovered this book when I took the girls to a craft and story time at a beautiful new toy store in town.  


And I had to buy it because it is beautiful and powerful and is a message about strong women and perfectionism and self confidence and I want to share all of that with Annie.

And because these two pages (spoiler alert!) made me feel so confident that I was making the right decision.


So there it is. 

I am ready to move on.

But first, there is the small matter of the inventory I have on had.  I would really love to see these things out in the world, being worn, spreading love, having adventures and being a part of special family occasions.

So I am selling everything I have made on Instagram, at 50% off, starting on Monday at 5pm PST.

     I am making a new account, @FLTsale for the occasion so that all of my followers do not have to be bombarded.  I just took new pictures and I have 85 wonderful items I would love for you to buy, some in multiple sizes.   Please come follow this new account, see everything I have on hand, stock up for baby showers, future babies, bigger sizes for the babies you have now.  When the sale is over I will shut it down so I don't clog up anyone's feed. 

     I will post a picture, with a short description and a price that includes shipping.  The first person to leave me their paypal email address gets the item and I will ship it within 24 hours of the invoice being paid.

     Anything that isn't claimed on Instagram after 48 hours I will post to my Fun Little Things Facebook page.

    There is a lot on the website that is made to order.  I have the supplies to make everything listed there, but it isn't necessarily all done.  If there is something you know you have been meaning to order, that is not part of the instagram sale,  you can still order there and I will make it up for you and get it out.  I will keep that open and as it is for one week after my Instagram sale.

And then, that is it.

I will still be using @gracefunlittlethings on Instagram as a personal account.  I would love for anyone who wants to see pictures of our adventures to stick around.  But all of my sewing pictures: fabric, works in progress, finished items on the wall or in use, will be on @makermountainfabrics.  Please, come follow me there if that is at all of interest to you.

Thank you all for your love and support and excitement over the last 4 years.  Thank you for reading my thoughts, following along on my journey, buying my Fun Little Things for the people you love.  Thank you for sharing parts of your life with me and for inspiring me to create new things and keep learning.

Time for new adventures!

xoxo

Friday, October 23, 2015

Half Yard Ruffle Skirt Tutorial

     Half a yard has been my go to fabric buying quantity for a long time.  Half a yard can make 4 bibs.  The perfect amount for one print for my little business.  It also is enough to make just about any kind of clothing for a baby.  So whenever I am in one of my favorite places (in person or online) and I see some fabric I just have to have, but don't really have a specific plan for, half a yard it is!  What it will become can be decided later, for now, I just need it cut and brought home. 


     But something strange has been happening.  Apparently, my awesome first child has been growing.  Shocking, I know!  She will be 3 in January (and she is growing into size 4T) and half a yard just does not cut it anymore.

    Except…

 for this ruffle skirt!  


So for those times you bought half a yard of the cutest little cats by Heather Ross, or some Cotton and Steel Paper Cut you just had to bring home, but then you realize your baby has become a toddler- no problem! Ruffle Skirt it is!  And you guys, no kidding, you can make this skirt from start to finish in one hour.  Now, if you insist on pressing and pinning every step of the way, and cutting very straight straight lines, it might take you a bit longer, but no more than an hour and a half, I promise, and even if you don't, the skirt will be darling! In case you need some convincing…

Things Ruffle Skirts Are Good For

Planning big jumps


Sister love


Climbing walls


Being a spider monkey


Sliding


Climbing ladders


Climbing slides


Sharing goldfish


And a whole lot of rope web climbing.


It may even inspire 9 month olds to climb the rope web too!


Oh, and not to be forgotten, ruffle skirts are great for getting in a little core workout!


This skirt can be made to fit 2T, 3T or 4T with the exact same fabric cuts and directions, just change the length of the elastic in the waistband.  So now that you are thoroughly convinced, let's get down to business!

Supplies: 

  • Half yard of fabric.  Quilting cotton works well, I am trying it next with some double gauze that is on its way to me (organic double gauze, by the bolt, details when it graces me with its presence.)  And it just so happens, for now at least, you can get these fantastic mama and baby cats (Cats Marching by Heather Ross) on white from me!  And I can ship your order tomorrow!
  • 3/4 inch elastic (or 1 inch, or 1/2 inch, whatever you have hanging around.  I would avoid 1/4 inch, it isn't going to do the trick.)
  • Thread, scissors, pins, iron, sewing machine… all that good stuff.  
  • Ruler or measuring tape.  

Step 1:

Lay that half yard down flat, big surfaces help for this.  If you iron it first, excellent, you are on the road to a more perfect ruffle skirt, if not, eh, it's all good.  I happen to have this enormous table over my washer and dryer.  It is the perfect height for a tall person like me to do some serious cutting.  It also happens to be marked with a wash tape measuring tape I made for cutting fabric orders for my shop.  I'm fancy, guys!  If you do not happen to have an enormous table, the floor works pretty well, you just might want to vacuum first, or try to not have one million pets.  

Step 2:  

You are going to cut this into 4 pattern pieces and a little leftover rectangle.  Start making plans for that scrap now so you can justify keeping it around forever.  You know you will.  

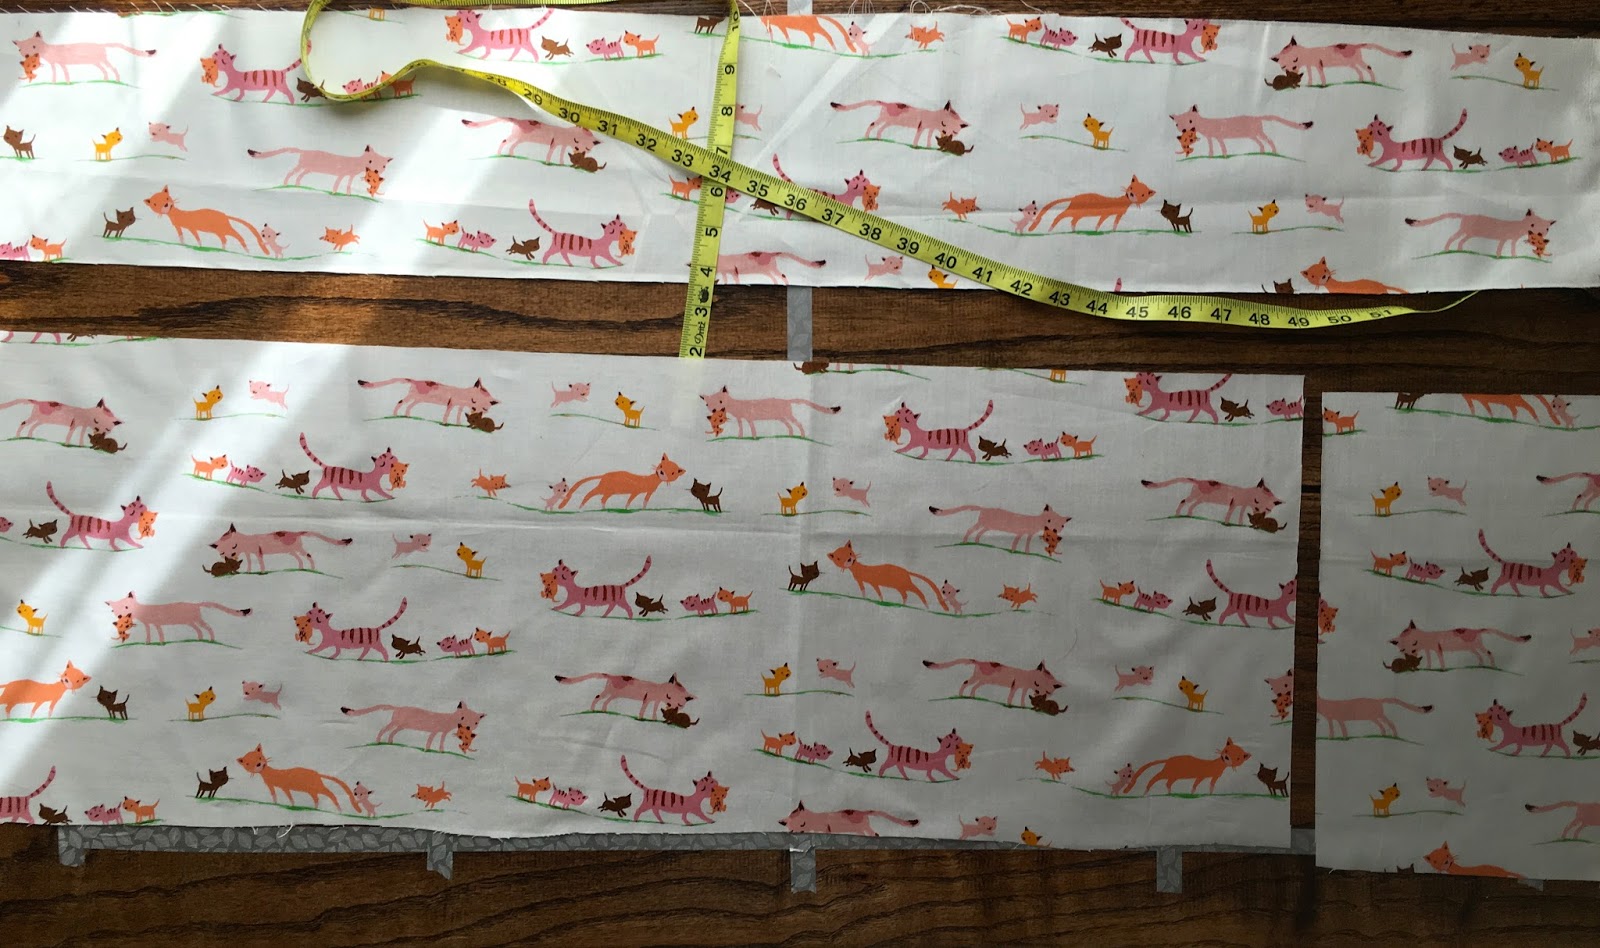
The first cut will go all the way across the width of the fabric, 12 inched up from the bottom.  

I like to make straight cuts across by measuring up 12 inches on the left and making a tiny cut.  Then I measure up 12 inches on the right, make another tiny cut.  

Then, all you have to do is fold the fabric at the cuts.


And cut up the fold!  Voila! A straight (ish) cut.  Using an iron and pressing would add some straight, perfectness to this process, but I promise you it is not required.


You will now have a piece that is 12 inches x 44 inches (and another that is 6 inches x 44 inches.)


Take your 12 x 44 inch piece and cut off 6 inches from one end.  This rectangle is your scrap.  Put it somewhere safe with all the other scraps you are really going to use one day.


Now take the 6 inch x 44 inch piece and cut it in to 3 strips that are all 2 inches by 44 inches.  Again, just measure up 2 inch, tiny cut, 2 more inches, tiny cut, and the same on the other side.  Fold, at the cuts, cut up the fold, your strips are done!


 Amazing!  You have your whole pattern cut out without printing, cutting, taping and more cutting, and it has only been about 5 minutes!  You rock and are well on your way to finishing this amazing skirt!


Step 3:  Hem all pieces!

For the skirt piece, fold and press 1/4 inch.  


Then fold and press 1 inch.  You can make this hem smaller if you have a tall kid and are worried about the overall length of the skirt.  I definitely have a tall kid, but she will mostly be wearing this skirt over leggings as it is finally starting to cool off around here, at least in the mornings and evenings, and it only got into the low 80s yesterday!  I have faith that one day soon it will actually stay cool all afternoon.


For the ruffle pieces you are going to want the hem to be tiny so you get more ruffle out of it.  If you have a rolled hem foot and know how to use it, this would be a great time!  If not, just fold and press then fold and press again, the smallest width you can without burning your fingers.


Sew the length of the pressed edge.


Ta da!  Four hemmed pieces!


Step 4:

Fold all pieces in half width-wise (like a hamburger, not a hot dog, for my teacher friends out there.)

Sew from top to bottom.  This will make all your pieces into circles that could go around your child, y'know, like a skirt.

Step 5:  Ruffles!


I just love those ruffle pictures a little too much! Sorry! Back on track!  If you have never sewn ruffles before, there are lots of great tutorials out there, but here is the quick version.  

Set your machine tension as loose as it goes and your stitch length as long as it goes.

Sew a straight line close to the un-hemmed edge of your ruffle pieces (start and end at the seam you just sewed, turning it into a loop), leaving long tails of thread at the beginning and end.  

Pull at the bobbin threads while wiggling and smooshing the fabric around until the width of the ruffle loop is the same as the width of the skirt piece.  Gently pull and push the gathers so that they are evenly dispersed around the loop.  

Repeat with the other two ruffle pieces.


Step 6:  Waistband

This is a lot like the hem, except that the size matters more.  If you are using 3/4 inch elastic, fold and press 1/4 inch, then fold and press 1 inch.  If you are using 1 inch elastic that second fold will have to be 1 1/4 inch, if you are using 1/2 inch elastic, the second press can be 3/4 inch.  The point of the story is, just make it a bit wider than your elastic.  


Sew almost all the way around, leaving a few inches open right by the seam so you can stick your elastic in there.  But don't do it yet!  Ruffles need to go on first!


Step 7:  Attach Ruffles to skirt

With the skirt right side out and up, and the ruffle pieces inside out and upside down, place the three ruffle pieces around the skirt.  They should be equal distances from each other, but a little closer to the top and further from the bottom.


Pin in place starting with the seams.


Next, pin the opposite side.


Then do a few pins along the middle (I used 3 more for each ruffle).  Pinning in this order will help you make sure your ruffles are straight and evenly spread out.

Flip the skirt over and pin a few pins in the middle on the other side.


Starting at the seams, sew the ruffle in place all the way around.  Make sure you have set your tension and stitch length back to normal.  Sew between the stitching you did to make the ruffle and the unfinished edge.  This is a pretty small space, so sew carefully!  Repeat with the other two ruffles.


Flip the ruffle down and the right side of the skirt will look like this.  You are getting there!


Step 8: Finish Ruffles

Those of you who have read other tutorials of mine (like these ones for a dinosaur tail, a baby blanket, a fabric scrap game or a maternity maxi dress)  might know there is usually a step that is perfect to do while having a glass of wine and watching some netflix.  This is that step.

Get your seam ripper, sit somewhere comfortable, pour a glass of wine and turn on that Netflix (or Hulu, I don't discriminate.)

Time to rip out those long, loose stitches you did to make the ruffles.  Rip, pull, cut, work your way around all three ruffles.  No rush here, take your time, make sure you are keeping up with whatever situation Olivia or Juliet have gotten themselves into.  And be sure to take enough wine sipping breaks to finish your glass before the show is over, or else you are going to have to stay up longer to watch another show, and you know you will regret that come 5:29 tomorrow morning when the adorable toddler you are making this skirt for comes into your room and starts turning your bedside light on and off as long as it takes for you to stop pretending you are still sleeping and get up (true story, friends).


Press the ruffles down.  Start with the bottom ruffle.


Then the middle.


Then the top.  This way you will not undo all the pressing you just did with the iron that is much wider than your ruffles.


Topstitch the ruffles close to the seam on top.  This will keep them pointing down (because no one has time to be ironing toddler skirts in the morning.)  It will also hide the raw edge under that ruffle, looking more professional and more importantly stopping fraying and loose threads from causing disaster.


Step 9:  Elastic

The length of elastic you need depends on the size of your child.  If your not-so-tiny-anymore-cute-one happens to be awake, you can measure around their waist, subtract half an inch and you have your elastic size.  If not, or if you are making this as a present for some other not-so-tiny-cute-one, check out this chart!

                                                                2T - 18 inches
                                                                3T - 19 inches
                                                                4T - 20 inches

Phew!  That was some complicated math, I hope I didn't lose you there!

Now take that perfect length of elastic, attach a safety pin to one side, put it in to the opening you left in the waistband way back in step 6 and thread it all the way around.  When you make it back out the other side, smooth the gathered fabric as much as you can and make sure the elastic didn't get twisted up in there.

Overlap the two ends of the elastic and sew them together.  I like to use a wide zigzag with a short stitch length to do this, and reverse and do it again, just to be sure.  A regular stitch would work if your machine doesn't zigzag (or if you just aren't into it) but just go back and forth a few times to make sure it is well attached.

Being sure to set your machine back to a straight stitch, sew closed that little opening.

Trim all your threads.

Step 10:  Put it on your toddler and make celebratory donuts, because you are done!