My nephew, Jack, is 20 months old and he loves dinosaurs (and trash trucks, and fire trucks and pretty much any kind of trucks!). I have been pinning to a secret "presents" Pinterest board for the past few months. I love pinterest, but have wanted secret boards for awhile. Although I do spend way too much time just trolling all of the popular listings on there as a way to procrastinate the things I should really be doing, I do really try to use it as a way of collecting projects and ideas I like and do not want to lose track of. I try to pin as much as I can from blogs I read regularly that inspire me, and not just repin those same pins you see over and over again. Sometimes though this is a problem, because some project I see instantly strike me as a perfect present for someone, and what if that someone happens to be my Pinterest friend, then they will know what I am planning! Oh, poor me, my life is hard! Haha! But this is why I was so excited when they started allowing secret boards. Really helped in my Christmas planning.
Any dinosaur related projects I saw over the past few months went instantly to the presents board. When it came time to get to work, these two tutorials were the winners I based my plan on. I completely recommend both of these tutorials if you would like to make your own dinosaur tail or sweatshirt. I did make some changes, because clearly I decided to make things a little more complicated, adding some fun details. So here is my tutorial and how to take the amazing work of these women and make it a little more like mine.
Dinosaur Tail!
Materials:
Click on the original link! She lists all the quantities of materials. The only difference in my tail was that I used 2 different colors for the spikes, so if buying fabric, buy 1/4 yard each of the two different colors you want to use, you will have extra for some other fun project or you could make two (in case your husband decides the tail is really cool and he wants one too, like mine may have).
Procedure:
1. Click the link again! Follow her instructions for step 1, trimming tail fabric.
2. Here is where I started making changes. The original tutorial makes a spike strip, making the project simpler, but only having one color of stripes. I wanted alternating spike colors, so I knew the strip wouldn't work. So the first thing you have to do if you want to be cool like me is make a spike strip pattern out of tissue paper (or any other paper you happen to have around the house).
 |
| I worked on mine on the ironing board only because it is tall, and I am tall, and have a giant belly currently, and bending over any of my tables is not particularly pleasant. |
Once you have cut the length, draw your spikes! I started big at one end and went smaller, so they will be smaller at the skinny end of the tail. This part is up to your own creativity, they can be more rounded, more pointy, a few big ones, lots of small ones, have fun with it.

3. Start cutting the spikes!
To save yourself time and effort, fold fabric A in half. Line up your spike strip pattern NOT on the folded seam - put the bottom of the spikes where the two open sides of the fabric are lined up.
Cut out the biggest spike on the pattern and through both layers of fabric.

Move the pattern down so that the next A spike is right next to where you just cut. Continue down the line cutting all of the A spikes. This will save you time switching back and forth between the two fabrics, just be sure to line them up as you cut them, so they don't get confusingly out of order.
You will be left with a piece of fabric A, and what is left of your spike strip pattern that looks like this.

4. Change to your other fabric color (fabric B, if you will...)
Do the same thing, cutting out the remaining B spikes, and placing the cut out pieces in the right places between the A spikes down the line.


Working with one spike at a time, sew the two top sides of the spike, but not the bottom!
If you want the spikes more pointy - sew a straight line to the top, leave the needle down, but lift the foot, turn the fabric, put the foot back down and sew another straight line back down the other side.
If you want the spikes more rounded - sew slowly and pull/turn the fabric as you going around the point.
If you aren't so particular or want them somewhere in between - start sewing and see what happens depending on how much attention you were paying or how careful you were being.
One guess which of these three methods I mostly used.

Each spike will end up looking like this!

Cut off the top of the fabric above the line you just sewed. Don't worry about trimming the other seams or bottom corners, anything that shows will be sewn into the inside of the tail.

Turn the spikes inside out.


6. Iron the spikes flat!

7. Sew tail body. Here again you can check back at Running with Scissors to see how she does it. It is only slightly more complicated with 7 little spikes instead of one long spike strip.
You have two options here, again related to how much you care about things being "perfect."
The right way:
Line the spikes up on the top edge of one of the big tail pieces, with the spikes pointing down into the middle of the tail.
Pin them in place.
Sew straight down the line to attach the spikes.
Place the other big tail piece on top (I should note, if you are using fabric that has a right and a wrong side, make sure the right sides are together. I used Kona Cotton which is the same on both sides).
Sew the two big tail pieces together all the way down the top edge, around the skinny end, and back up the bottom edge.
But Wait! - Leave a few inches open on the bottom edge so you can turn everything right side out and stuff the tail.
The easy way:
Place the spikes on one of the big tail pieces, pointing down and in.
Place the other big piece on top of the spikes.
Use some pins to hold things in place.
Sew the two big pieces together just as above.

8. Sew waist straps.
The only change I made here was the make the velcro strips longer. My nephew is still pretty young, and skinny, and I was worried about the tail not being able to get tight enough to stay up around his little waist. Longer velcro gives more freedom in sizing.
Read her tutorial for how to sew the straps. They are pretty easy breezy.


3. Next I did some math and a little drawing. The curved line here is the folded, ironed edge of the sweatshirt. The triangle marked 1 is the biggest triangle, then I just counted out in each direction from there.
I measured my spike pattern to determine the size of these spikes. Number 1 was 3 1/4 inches tall.
Now is the time when you should probably check in with the original tutorial. She is genius and realized that the best way to attach these spikes, is to make diamonds, so to make a spike the size I wanted, the diamond would need to be 6 1/2 inches tall.
****In the original tutorial she used felt. I really wish I had read this before buying my fabric and making my plan. The edges of felt do not need to be finished and make the end of this process easier. The same goes for fleece if you want some fleece spikes.
If you want yours to match your tail, and you have been using Kona cotton like me, you will have to finish the edges. Don't worry, it is a little extra work, but I will explain that process at the end.
If you want to use felt or fleece, you can switch to her tutorial now, or keep reading mine for awhile for sizing and placement.
If you are using cotton, you should probably just stick with my tutorial here. ***
Each size smaller of spike I wanted, I cut out 1/4 inch from each half of the diamond, or 1/2 inch total.
This chart helped me work out the sizes and keep track of how many I needed to cut of each size.

Then the green, too!
5. Unfold the sweatshirt and the spikes. See, I told you they would become diamonds! I then pinned the diamonds in place.
6. Take the sweatshirt to the sewing machine and sew a line (or two) straight down the back of the sweatshirt through the middle of all of the diamonds.

7. Here's where the (slightly annoying) edge finishing comes it.
Using your iron, press the edges of all of the diamonds in towards the centers. You have have to do some trimming with scissors and careful folding at the corners.
8. Fold the diamonds back into triangles and pin them together.

9. Carefully and as best you can (there is maybe no way to do this "perfectly" sorry if you are one of those people. I clearly am not, but even I was careful here and got the job done pretty well) sew together the two pressed and pinned edges.

 |
| My spike pattern had 7 spikes, just what kind of worked out as I drew. |
Because I wanted to alternate spike colors, I labeled the pattern pieces A and B, and drew small lines between the spikes. If you wanted more colors, you could label them with as many letters as you like, or really even just do each one a different color. You have so many options!

3. Start cutting the spikes!
To save yourself time and effort, fold fabric A in half. Line up your spike strip pattern NOT on the folded seam - put the bottom of the spikes where the two open sides of the fabric are lined up.
Cut out the biggest spike on the pattern and through both layers of fabric.

Move the pattern down so that the next A spike is right next to where you just cut. Continue down the line cutting all of the A spikes. This will save you time switching back and forth between the two fabrics, just be sure to line them up as you cut them, so they don't get confusingly out of order.
You will be left with a piece of fabric A, and what is left of your spike strip pattern that looks like this.

4. Change to your other fabric color (fabric B, if you will...)
Do the same thing, cutting out the remaining B spikes, and placing the cut out pieces in the right places between the A spikes down the line.

5. Sew the spikes.
You already have the two pieces lined up together because of the way you cut through both layers at once (see how I am looking out for you and making things as easy as possible?)

Working with one spike at a time, sew the two top sides of the spike, but not the bottom!
If you want the spikes more pointy - sew a straight line to the top, leave the needle down, but lift the foot, turn the fabric, put the foot back down and sew another straight line back down the other side.
If you want the spikes more rounded - sew slowly and pull/turn the fabric as you going around the point.
If you aren't so particular or want them somewhere in between - start sewing and see what happens depending on how much attention you were paying or how careful you were being.
One guess which of these three methods I mostly used.

Each spike will end up looking like this!

Cut off the top of the fabric above the line you just sewed. Don't worry about trimming the other seams or bottom corners, anything that shows will be sewn into the inside of the tail.

Turn the spikes inside out.


6. Iron the spikes flat!

7. Sew tail body. Here again you can check back at Running with Scissors to see how she does it. It is only slightly more complicated with 7 little spikes instead of one long spike strip.
You have two options here, again related to how much you care about things being "perfect."
The right way:
Line the spikes up on the top edge of one of the big tail pieces, with the spikes pointing down into the middle of the tail.
Pin them in place.
Sew straight down the line to attach the spikes.
Place the other big tail piece on top (I should note, if you are using fabric that has a right and a wrong side, make sure the right sides are together. I used Kona Cotton which is the same on both sides).
Sew the two big tail pieces together all the way down the top edge, around the skinny end, and back up the bottom edge.
But Wait! - Leave a few inches open on the bottom edge so you can turn everything right side out and stuff the tail.
The easy way:
Place the spikes on one of the big tail pieces, pointing down and in.
Place the other big piece on top of the spikes.
Use some pins to hold things in place.
Sew the two big pieces together just as above.

8. Sew waist straps.
The only change I made here was the make the velcro strips longer. My nephew is still pretty young, and skinny, and I was worried about the tail not being able to get tight enough to stay up around his little waist. Longer velcro gives more freedom in sizing.
Read her tutorial for how to sew the straps. They are pretty easy breezy.

9. Finish the tail. Again, read her tutorial. She does a great job of explaining the finishing steps for the tail. I wasn't so particular with marking the 1/4s of the circles, I just pinned it in place, but again this gets down to how much you care about things being "perfect." Mine turned out pretty darn good.

It looked very cute on my table! I had been keeping the project a secret from everyone in my family so they would all be surprised on Christmas, but when I finished the tail I was so excited by its cuteness I instantly had to FaceTime my mom to show it off to her.
Turns out Jack was with her at the time, but she succeeded in distracting him with Cars long enough for me to show her what I had made without him seeing.
It looked oh so much cuter the morning after Christmas when Jack was wearing it to play with his firetruck.

Dinosaur Sweatshirt!!!
I know, I know, after all that you thought you were done, but oh no - What if your little dinosaur wants to go outside? There clearly must be a spiked sweatshirt to go along with the tail.
I promise this part is much less work.
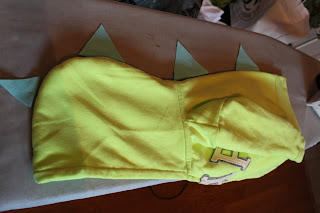
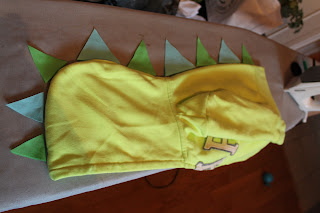
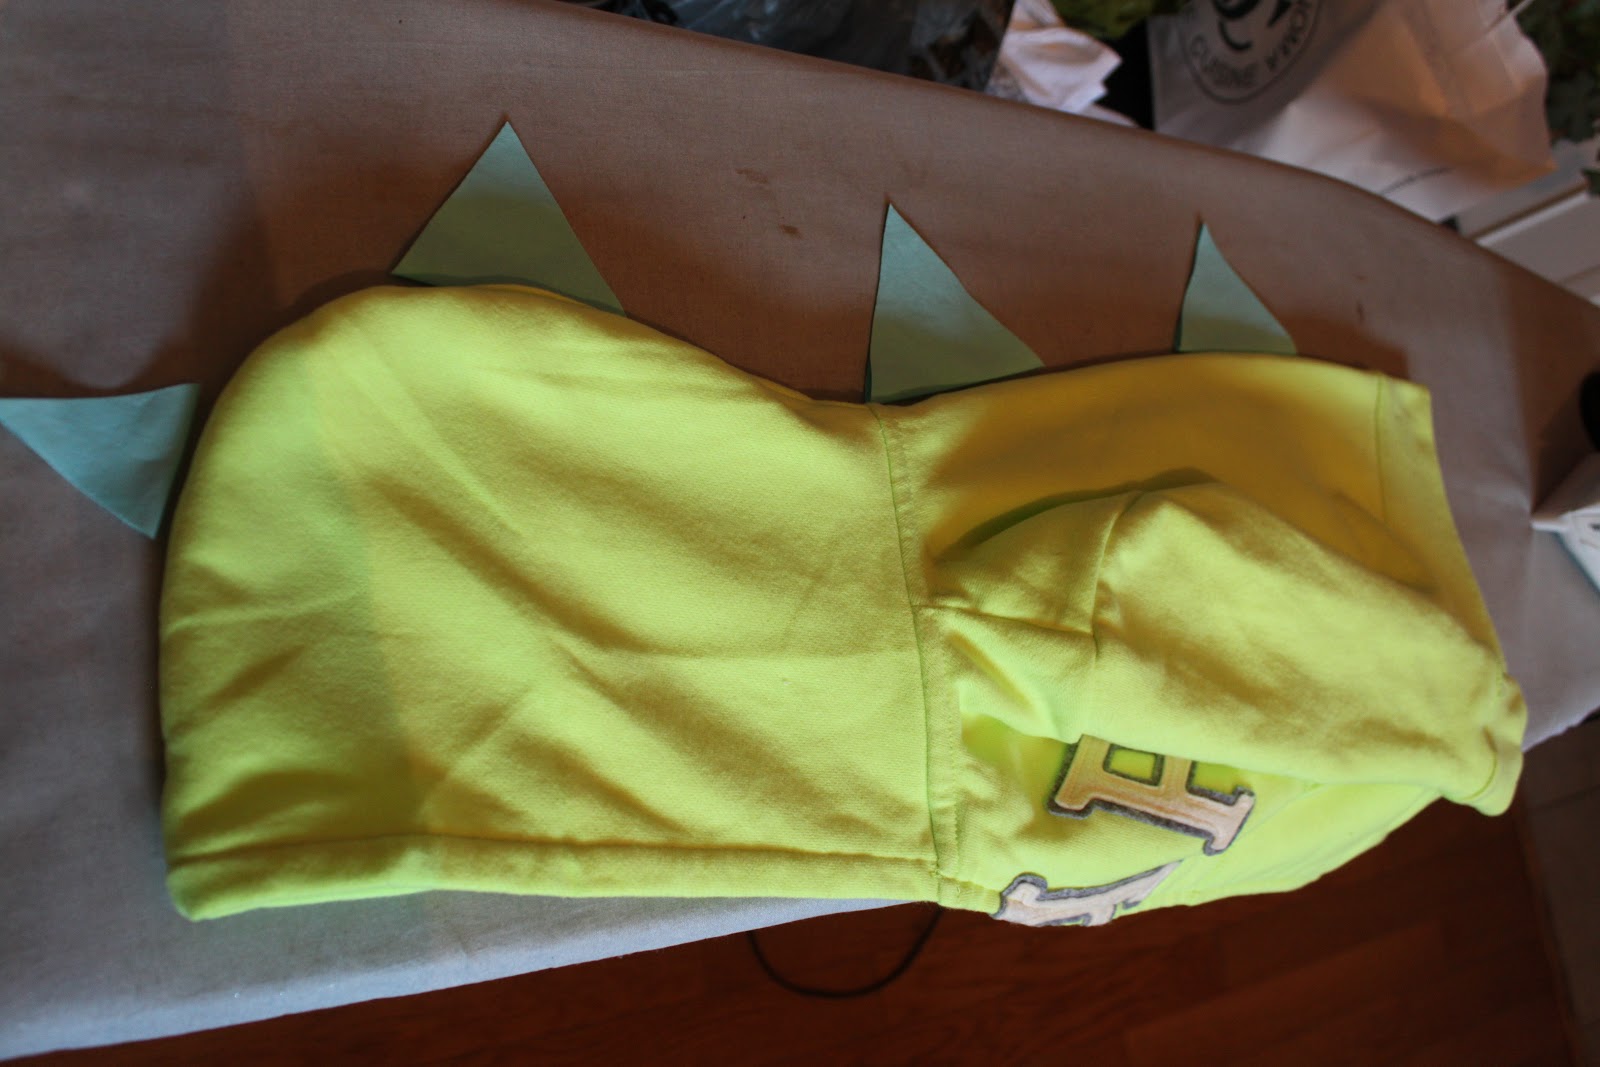
1. Buy a sweatshirt that fits your dinosaur. Hoods are pretty important here. A cool neon, dinosaur-ish color also comes in handy. Jack's is a neon yellow/green. Awesome!
2. So that the tail and sweatshirt spikes matched, I used the same spike pattern pieces I cut out for the tail to plan the spikes for the sweatshirt.
Fold the sweatshirt in half, lengthwise. The hood of my chosen sweatshirt had a seam down the back, which made this easier, but just line up the front sides of the hood and the zipper edges, and iron to create an edge you won't lose.
I placed the biggest spike at the top of the back, under the hood, then got smaller towards the bottom of the sweatshirt and up and around the top of the hood. For the 2T sweatshirt I was using, it took 4 spikes down the back (including the biggest one) and 5 more up and over the hood. The bigger your sweatshirt, the more spikes you will need.


3. Next I did some math and a little drawing. The curved line here is the folded, ironed edge of the sweatshirt. The triangle marked 1 is the biggest triangle, then I just counted out in each direction from there.
I measured my spike pattern to determine the size of these spikes. Number 1 was 3 1/4 inches tall.
Now is the time when you should probably check in with the original tutorial. She is genius and realized that the best way to attach these spikes, is to make diamonds, so to make a spike the size I wanted, the diamond would need to be 6 1/2 inches tall.
****In the original tutorial she used felt. I really wish I had read this before buying my fabric and making my plan. The edges of felt do not need to be finished and make the end of this process easier. The same goes for fleece if you want some fleece spikes.
If you want yours to match your tail, and you have been using Kona cotton like me, you will have to finish the edges. Don't worry, it is a little extra work, but I will explain that process at the end.
If you want to use felt or fleece, you can switch to her tutorial now, or keep reading mine for awhile for sizing and placement.
If you are using cotton, you should probably just stick with my tutorial here. ***
Each size smaller of spike I wanted, I cut out 1/4 inch from each half of the diamond, or 1/2 inch total.
This chart helped me work out the sizes and keep track of how many I needed to cut of each size.

In case my handwriting is hard to read, or just the picture:
How many Spike number spike size diamond height
1 1 3 1/4" 6 1/2"
2 2 3" 6"
2 3 2 3/4" 5 1/2"
2 4 2 1/2" 5"
1 5 2 1/4" 4 1/2"
1 6 2" 4"
4. Cut the spike pieces.
Use the same pieces of folded fabric you used for the tail spikes.
This time you will be working with the folded seam edge.
Use a ruler and a water soluble pen (or chalk).
Measure, mark and cut the triangles (when you open the seam you just cut on, it will magically - or by the powers of geometry - be a diamond). I made my biggest spike 3 inches wide, each one got a little smaller, just use your judgement here of what you think looks good.
As I cut I lined up the spikes where I wanted them on the sweatshirt. First the blue.
Then the green, too!

5. Unfold the sweatshirt and the spikes. See, I told you they would become diamonds! I then pinned the diamonds in place.
6. Take the sweatshirt to the sewing machine and sew a line (or two) straight down the back of the sweatshirt through the middle of all of the diamonds.

7. Here's where the (slightly annoying) edge finishing comes it.
Using your iron, press the edges of all of the diamonds in towards the centers. You have have to do some trimming with scissors and careful folding at the corners.
 |
| Some of them may look ugly like this. |
 |
| But hopefully most of them end up looking pretty like this! |


9. Carefully and as best you can (there is maybe no way to do this "perfectly" sorry if you are one of those people. I clearly am not, but even I was careful here and got the job done pretty well) sew together the two pressed and pinned edges.

10. Do this too all of the spikes.
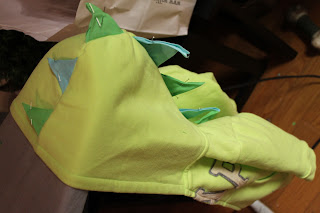
11. Hold it up and look at how cool it is!
12. Get excited and realize that all of that edge finishing was totally worth the annoyance because now you have a dinosaur sweatshirt and tail that match!
13. Put the sweatshirt on your favorite little (or big) dinosaur ASAP so you can giggle and enjoy your hard work. And so that they can have fun too...
That is it! You are done! I hope you have as much fun making this dinosaur project as I did, and hopefully you can surprise some little person you love! Thank you so much to the two women who wrote tutorials on the original projects that I based my work on, and thank you to the random pinners out there who helped me find these projects and these great blogs which I now follow.
Please, please, leave me comments if you have questions or tips on some of the tricky parts that might simplify things for others out there wishing to do the same!
No comments:
Post a Comment